
Help:Images
 |
This page documents Help for users on Grand Theft Wiki. |
Images are great tools for illustrating an article, however they should not be obtrusive or overused.
Uploading an Image
To upload an image into Grand Theft Wiki, simply click Upload file from the menu on the left. There, browse for the image on your PC (or use a valid accessible URL) which you want to upload, give it a filename and write in the Summary exactly what that image is, where you got it from (if you know), or use a relevant Copyright tag.
Make sure the image you are uploading does not already exist - check the articles that your picture is about to see if it is there. If your image is better than one that already exists, you can replace that image with your own by going to that image's page (eg Image:Mike-GTAA.jpg) and choosing "Upload a new version of this file". This will simply take you to the upload form and give your image the same name as the existing one so that it will replace it.
The bigger an image you upload the better, but do not force an image to be bigger than it really is (eg editing it in Photoshop). It is better if you can find an image without captions
Make sure that you do not upload copyright images unless you have permission to use them by the creator, or it qualifies as "fair use" (eg GTA screenshots or company logos).
Clicking "edit" on an image page will allow you to edit the text for that page. There, you can put a description of what is in the image; links to the things in it (such as characters, vehicles or places); the Categories the image is in; or a copyright tag to show who made the image, and what people can do with it.
Using Images

To show an image in an article, it must first be uploaded to Grand Theft Wiki (see above). Once uploaded, you need to copy the images name which shows up at the top, eg Image:Mike.jpg - if the image is already on a page, click on the picture and then the name of the image will show up at the top.
If you put the name of an image into a [[link]] (must begin with Image:), it will show up as an picture. However, that often looks silly, so we have to add extra stuff to that link to make it look good and fit nicely on the page.
Putting "|thumb" into the link gives the image a box around it; makes sure it is no bigger than 180 pixels wide; and tells it to "float" over to the right. An example of this is the ship image here:
[[Image:Liberty_docks.jpg|thumb]]
You can further edit this image tag to customise its appearence - you must separate each attribute with a vertical line ( | ).By adding "200px", you make the image 200 pixels wide, and the height will automatically adjust to make the image fit. By adding "left" you can tell it to float left instead of right.
Also, by adding some words, we can give the image a caption (words below it). You can put links into the caption, but it MUST have exactly the right number of square brackets ][ or else the entire image will break. The caption will also be used as the ALT tag for the image, which shows up when you hover over the thumbnail or if the image doesn't show up.
[[Image:Liberty_docks.jpg|thumb|200px|left|A Ship from the [[Grand Theft Auto IV]] Trailer]]

If the image is smaller than 180 pixels, then there is no need to specify a size in the image tag. If you use a small image (eg Image:Crystal-ball.gif) and force it to be big (eg 80px wide) then it will look pixelated and not very good (see the image on the right). Just leave out the size altogether, and the image will show up as big as it is supposed to be, and if it is bigger than 180px it will be made smaller.
Of course an image does not have to be a thumbnail. If you take the "thumb" attribute out, the image will show without the box or the caption, and the caption will be used as the ALT tag for the image, which shows up when you hover over the image or
If you want to put something (eg text, a table or another image) after an image that has been floated off to the left or right, you can force a clear-break with <br clear="all" /> or <code><br clear="both"></code>. You can see this being used above, to make the grey code box show up after the ship image has finished, instead of sticking out to the side. This is usually used to allow the next thing to use the full width of the page, or for another image to be positioned at the same side. However, some objects such as the <pre> tag used above need to be positioned after a clear-break, or they might not show up properly.
Extended Image Syntax
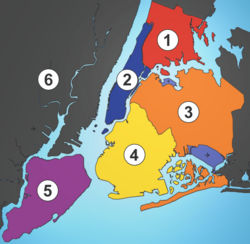
1: Bohan (Bronx), 2: Algonquin (Manhattan), 3: Dukes (Queens), 4: Broker (Brooklyn), (5: Staten Island), 6: Alderney (New Jersey)
Click on a borough on the map to go to that page
There are more things that can be done with images. They can be placed in galleries, tables or inline with text. See Meta for more information on those - it will be documented here soon.
Grand Theft Wiki also has an extension for creating image maps, such as that at Template:NYC (shown on the right). This means that if you hover over parts of the image, they link to different pages. Details on how to do this will be documented here soon.